Before starting the setup process of API Keys you must first have Billing Enabled on your Google Console Account.
Please go to the following url and select your project to enable billing
https://console.cloud.google.com/project/_/billing/enable
- Go to the Google Cloud Platform Console.
- Click the Select a project button, then select your project you set up for the WooFood and click Open. *If you don’t have a project create a new on
- From the list of APIs on the Dashboard, look for Places API.
- If you see the following APIs Maps Javascript API , Distance Matrix API , Places API, Geocoding API in the list, are already enabled. If the APIs are not listed, enable them:
- At the top of the page, select ENABLE APIS AND SERVICES to display the Library tab. Alternatively, from the left side menu, select Library.
- Search for Places API, then select it from the results list.
- Select ENABLE. When the process finishes, Places API appears in the list of APIs on the Dashboard.
- Repeat steps 2 and 3 for Maps Javascript API and Distance Matrix API
The next step is to create API Keys to use them inside WooFood settings. On this step you must create 2 different API Keys. The first one will be used for Address Automatic Completion while the other one will be used to calculate the distance from the store to your customer location.
Important Note: We need to create 2 separate keys because we cannot apply the same restrictions keys. Different restrictions are required to applied to each key.
First step is to create the Key for Address Autocompletion.
- Go to the Google Cloud Platform Console.
- Click the project drop-down and select or create the project for which you want to add an API key.
- Click the menu button and select APIs & Services > Credentials.
- On the Credentials page, click Create credentials > API key.
The API key created dialog displays your newly created API key. - Click Close.
The new API key is listed on the Credentials page under API keys.
(Remember to restrict the API key before using it in production.)
Second step is to restrict the API key for Address AutoCompletion
- Go to the Google Cloud Platform Console.
- Click the project drop-down and select the project that contains the API key you just created on the above step.
- Click the menu button and select APIs & Services > Credentials.
- On the Credentials page, click the name of the API key that you want to secure.
- On the Restrict and rename API key page, set the restrictions:
- Application restrictions
- Select HTTP referrers (web sites).
- Add the referrer as this example: https://yoursiteurl.com/* Notes: Be sure that you have including the asterisk (*) at the end of url to catch all the urls of your website. Also if you are using www don’t forget to include it on your url.
- API restrictions
- Select Restrict key.
- Click Select APIs and select Maps JavaScript API and Places API.
(If the Maps JavaScript API is not listed, you need to enable it.)
- Click SAVE.
- Application restrictions
Let’s create the Distance Matrix API Key for WooFood to be able to calculate the distance
This is actually the same process as we done previously with the previous key.
- Go to the Google Cloud Platform Console.
- Click the project drop-down and select or create the project for which you want to add an API key.
- Click the menu button and select APIs & Services > Credentials.
- On the Credentials page, click Create credentials > API key.
The API key created dialog displays your newly created API key. - Click Close.
The new API key is listed on the Credentials page under API keys.
(Remember to restrict the API key before using it in production.)
Apply Restrictions to Distance Matrix API Key
- Go to the Google Cloud Platform Console.
- Click the project drop-down and select the project that contains the API key you just created on the above step.
- Click the menu button and select APIs & Services > Credentials.
- On the Credentials page, click the name of the API key that you want to secure.
- On the Restrict and rename API key page, set the restrictions:
- Application restrictions
- Select IP Addresses
- Add your Server’s IP Address here Notes: If you are not use what’s your Server’s IP you can check it by going to https://dnsmap.io/ and type your domain name and select A and press Check DNS Propagation
- API restrictions
- Select Restrict key.
- Click Select API and select Distance Matrix API and Geocoding API.
(If the Maps JavaScript API is not listed, you need to enable it.)
- Click SAVE.
- Application restrictions
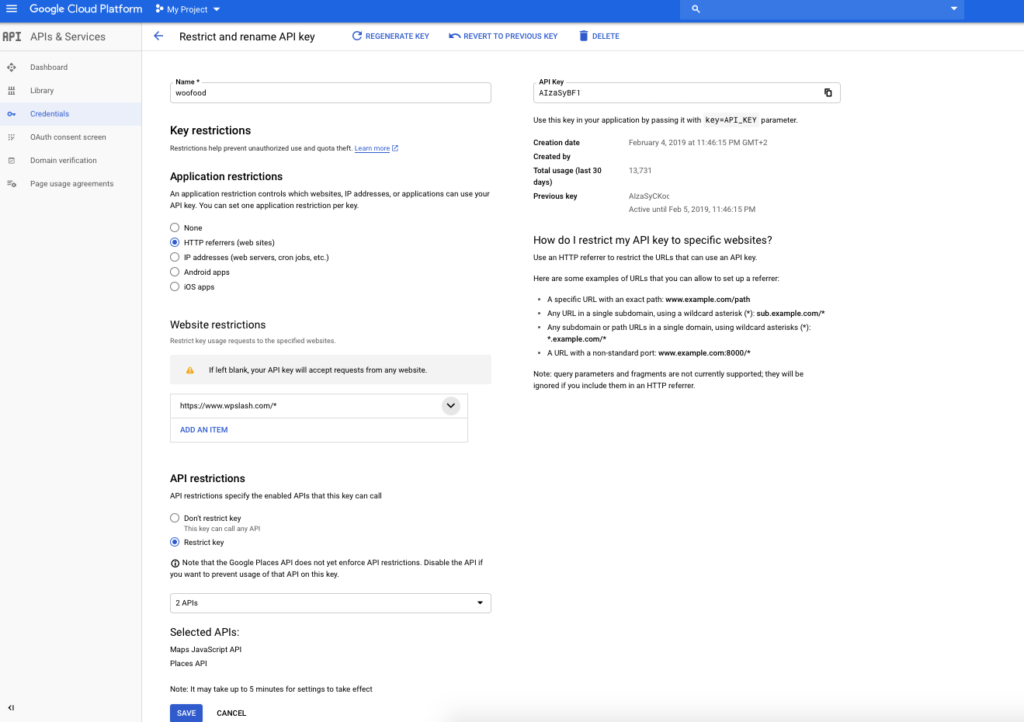
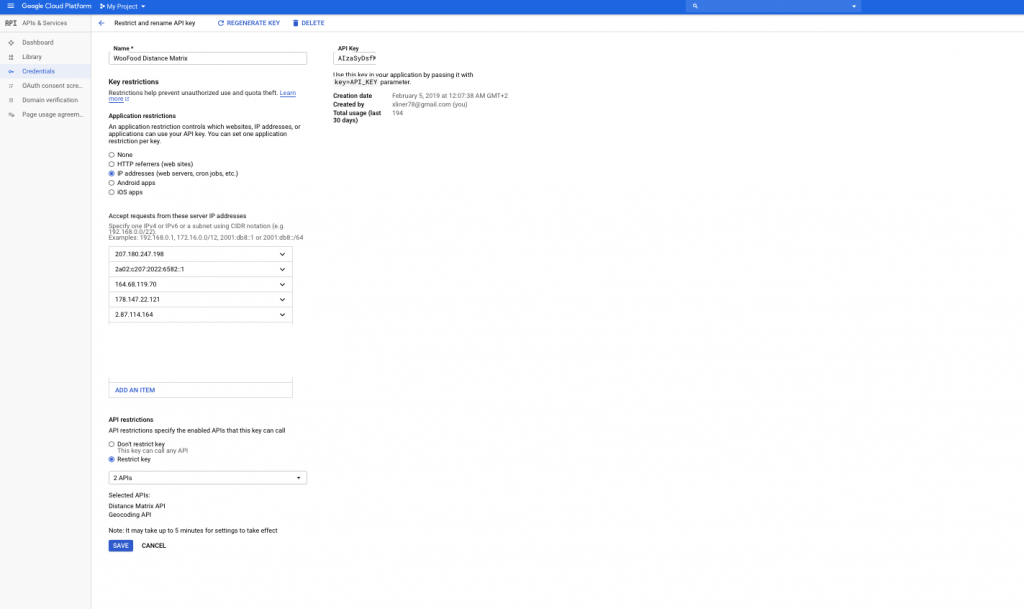
When you finish the setup with keys your configurations should like the following screenshots
This configuration is for Places API and Maps Javascript API that will be used for address autocompletion

This screenshot is for the Distance Matrix API Configuration

Important Notes
- If you have selected Distance in KM you can skip the Geocoding API .
- If you have selected Design Area(Polygon) you can skip the Distance Matrix API .
- Maps Javascript API and Places API are required for address automatic completion
Note: The above instructions are required to integrate Google Places, Maps Javascript API, GEOCoding API and Distance Matrix API to WooFood . Of-course you can follow the guide to integrate them for a third party Integration .
If you don’t know WooFood yet, please take a look on the best food ordering plugin .