Complete guide to help you get started and make the most of WooFood
WooFood is an all in one solution for WordPress & WooCommerce including Plugin, Theme & Automatic Order Printing Software for WooCommerce compatible for Windows and MAC. Includes everything you need to create your online delivery website for your Fast Food, Coffee, restaurant .
WooFood also includes a multistore plugin to extend the main WooFood plugin for multiple restaurant locations. It can send the order automatically to the nearest to the client store.
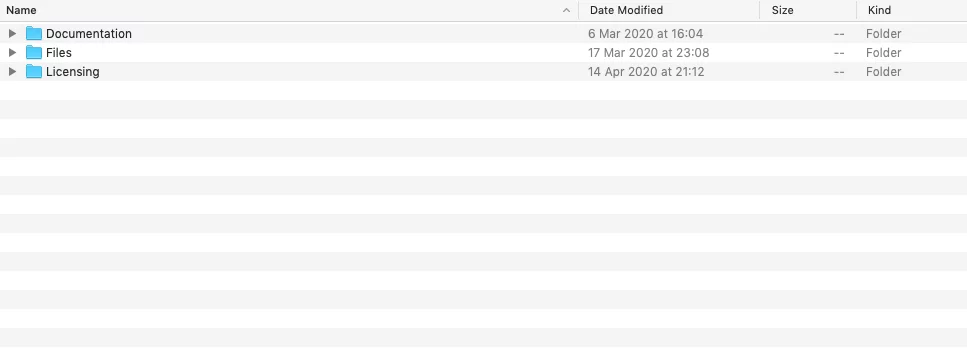
1)After downloading the zip files from Codecanyon you will have to unzip first the file. Do not upload it directly as contains also multiple plugins and the Automatic Printing Software
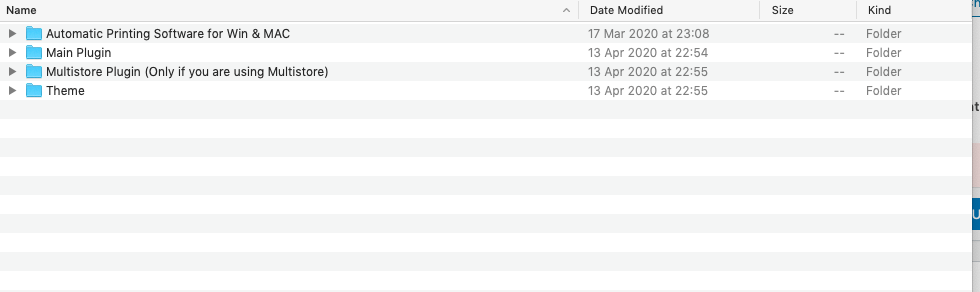
If you want to use WooFood Theme also go inside Theme folder and upload woofood.zip by going to your WordPress Admin Dashboard > Appearance > Themes > Add New > Upload and select the woofood.zip
Note: Does not required to upload also the plugin as WooFood plugin already included in WooFood Theme and will automatically be enabled after enabling the Theme.
If you have multiple locations go inside Multistore Plugin folder and upload also woofood-multistore-plugin.zip
Note: Do not upload woofood-multistore-plugin.zip if you don’t want to use multiple locations.
If you are using already your own theme and you want to use only the plugin go inside Main Plugin and upload only the woofood-plugin.zip.
If you have multiple locations go inside Multistore Plugin folder and upload also woofood-multistore-plugin.zip
Note: Do not upload woofood-multistore-plugin.zip if you don’t want to use multiple locations.
After enabling the plugin Go to WooFood->Settings and type your License Number(Purchase Code on Codecanyon) and press Save Changes, you can also set the minimum order amount, set the average delivery time or select the automatic delivery time calculation to be enabled to automatically calculate the time based on the product process time.
Before creating extra options you should first have created an extra option category to assign the extra options there.
Navigate to WooFood >Extra Option Categories Management.
You will see a button Add New Extra Option Category. Clicking on the button will create a new Extra Option Category and a modal will appear where you can add extra options.
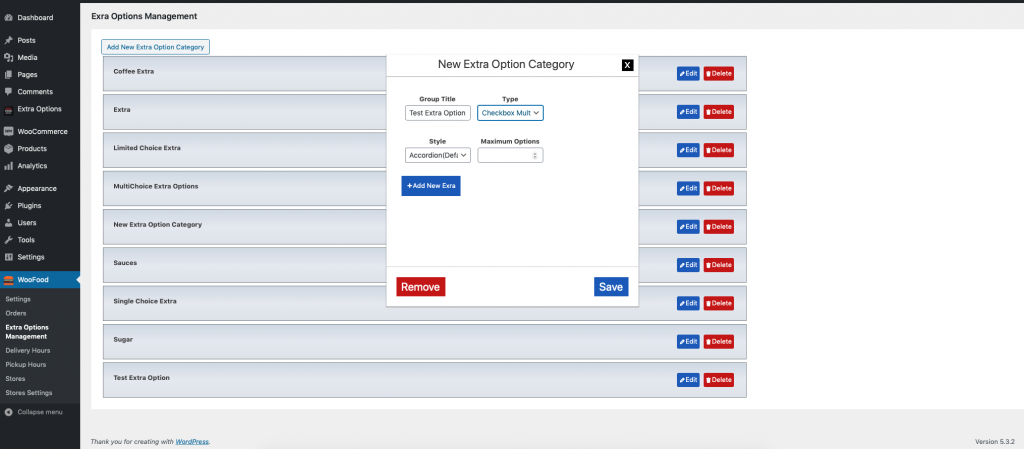
Set a name like “Sauces” on Group Title. You can select the type of extra option category from Checkbox Multichoice, Checkbox Limited Choice, Single Choice Radio and Single Choice Select.
Select also the Style of the Category from Accordion or Flat
If the selected type is Checkbox Limited Choice don’t forget also to fill also the Maximum Options field.
Navigate to WooFood->Extra Options Management and click on edit on an extra option category you have created earlier.
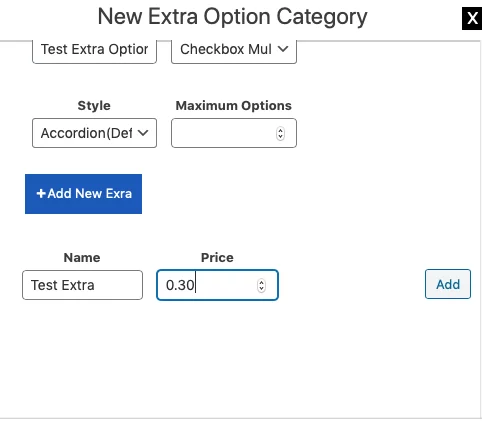
On the above screenshot, you can see the Add New Extra button where you can press it to add a new extra option.
After pressing the button Name, Price fields are appearing below with a new button Add.
Complete the name of the extra option and the price (leave it empty or set it 0 if this extra option is free of charge ) and press Add
After pressing the Add button your extra options will look like the following screenshot.
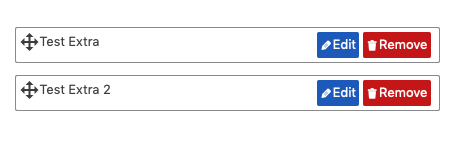
You can drag n drop the extra options to change the order that will appear to the end-user. You can also edit the extra options by pressing the Edit button or Remove button to remove the extra option.
After pressing the Edit button your screen will look like the following screenshot.
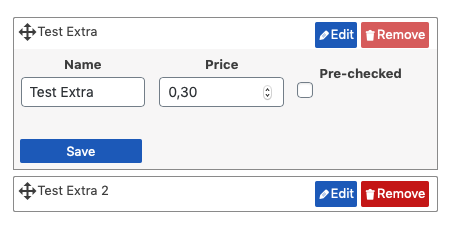
You will have noticed that you can change the price the name and you can also set if these extra options are prechecked. After making your changes don’t forget to press Save.
Create a Simple Product on WooCommerce ( let’s name it, for example, Crispy Chicken Burger Simple).
Under the Product Data Section, you will notice a new tab WooFood Extra Options.
Select the WooFood Extra Options tab and what you see will look like the following screenshot.
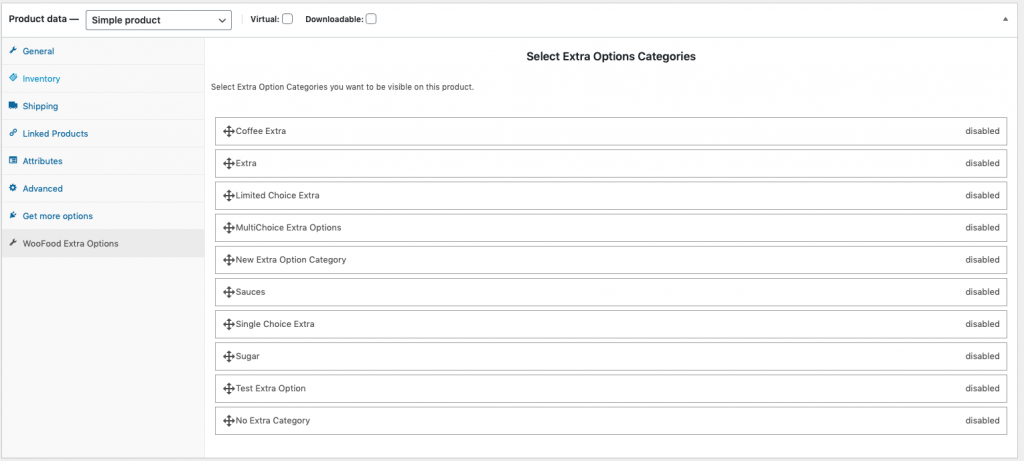
You will see all the Extra Option Categories( If you want to set multiple extra option categories on the product you can select multiple by pressing the CTRL button on Windows or the CMD button on MAC, to select them.
You can select the Extra Option Categories you want to be visible to the product by clicking on the Extra Option Category you want..
You can drag n drop also the Extra Option Categories to sort the categories.
After picking some Extra Option Categories for the product your screen will look like the following screenshot.

Save the product and you are ready!
Create a Variable Product on WooCommerce(let’s name it, for example, Crispy Chicken Burger Variable)
Under attributes, I have created a new attribute with name Size for example and added these Options: Regular, XL
Now let’s go to Variations and select Create Variations from All Attributes and press Go
This will create 2 variations: One for Regular and one for XL.
Now Expand the variation and you will see a new multi-select field “Select Extra Option Categories” added from WooFood Plugin and select the extra option categories you want to be visible on this variation. Do the same also for all variations you have.
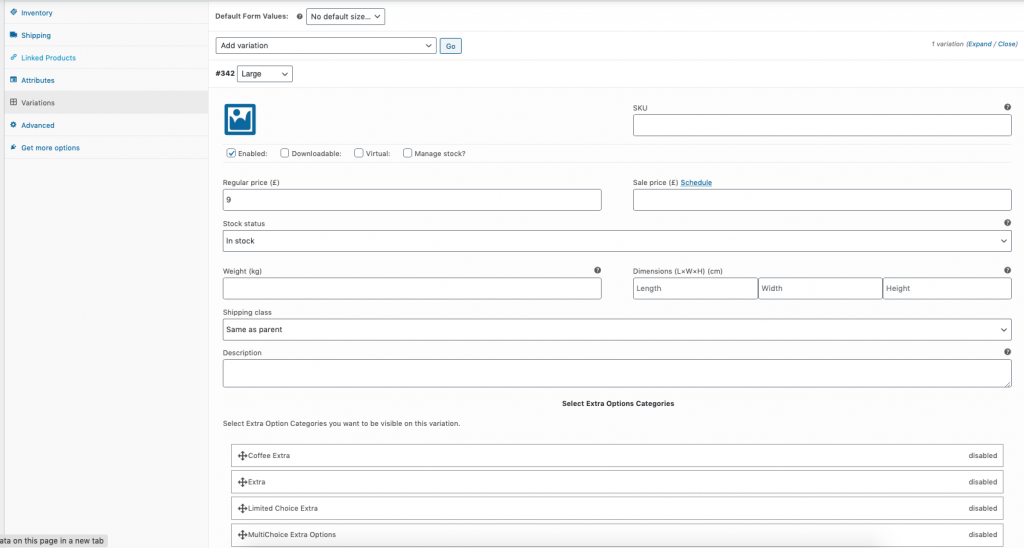
Note: If for example in the Regular variation you want to show extra option categories but you don’t want to show extra option categories on the XL variation, select No Extra Category on XL.
Note: Don’t forget to Save the Variation
The distance is calculated based on the real distance from the customer to the store address under WooFood settings. If you are using WooFood Multistore Plugin the calculation will be made based on the specific store address and the maximum distance limit.
To choose Distance Based calculation, Navigate to WooFood > Settings > Delivery and scroll to Maximum Distance for Delivery. Here you will have to select Distance in km and specify the number of km you are delivering like the following example.
Note: Be sure that you have followed this tutorial to configure Google API Keys required.

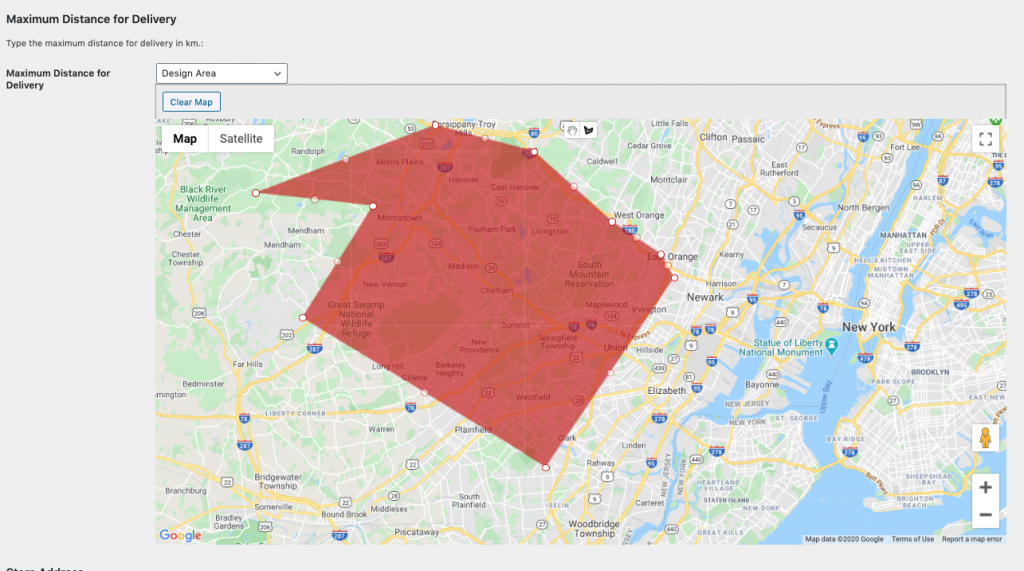
The distance is calculated based on the polygon you can draw on the map. If your customer’s address is located inside the polygon the order will pass normally. Otherwise, the customer will get a message that you are not delivering to this area. Like on Distance-Based calculation if Multistore Plugin is used you will have to create polygons for each store under WooFood > Multistore Settings > Your Store
To select Polygon Based calculation navigate to, WooFood > Settings > Delivery and scroll to Maximum Distance for Delivery. Here you will have to select, “Design Area”. After selecting “Design Area” you will be able to draw on Google map the area you are delivering to, like on the following screenshot.
Note: Be sure that you have followed this tutorial to configure Google API Keys required.
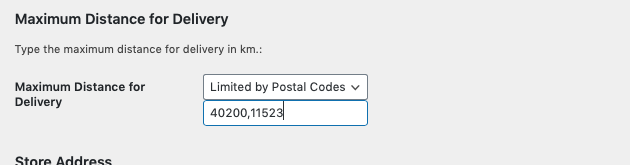
There is no actual distance calculated here. If the customer types a postal code that you specified it the order will normally pass.If Multistore Plugin is used you will have to specify postal codes for each store under WooFood > Stores
To select Postal Code Based calculation, go to WooFood > Settings > Delivery and scroll to Maximum Distance for Delivery. Here you will have to select Limited by Postal Codes. Now specify the postal codes you are delivering to (comma separated) like in the following example.
To be able to use Distance Based / Polygon Area-based calculation you will have to use Google API Keys. Because the whole implementation with Google API Keys sometime may be difficult we have created a step by step guide to configure it easily in no time here
Accept / Decline is an optional feature that can be enabled under WooFood > Settings > Accept /Decline . Enabling this feature all the orders will have to manually accepted in live time under WooFood Automatic Printing Software or Under WooFood > Orders.
This feature set all the new orders to status Accepting. You will have to accept the order and give an estimated time to process the order in live mode if you have this feature enabled. After acceptance, the order getting the status processing.
Note: In case the customer using a credit card as a payment method he will not be charged if you decide to decline the order as the order acceptance happening before the payment triggers.
If you want to add the WooFood accordion menu with all categories use the following shortcode to any page
Here is a simple guide on how to use WooFood shortcodes
[woofood_accordion open="yes"]
[woofood_accordion orderby="menu_order" order="ASC"]
WooFood now supports Gutenberg Blocks. You can easily select the WooFood Categories Accordion and select the category you want to insert as accordion or select all categories.

Enable this checkbox is you want to load products using our modal popup without refreshing the page.
Products (simple and variable )also are added to the cart via AJAX
Go to Site Identity and upload your logo and set your site icon.
You can also change all the colors of the Theme like the following
If you want to use the Theme’s default frontpage set the Static Front Page to Your latest posts
Now let’s set up the automatic order printing on your Windows.
Note: Be sure that you have enabled pretty permalinks on General >Settings on your WordPress settings, otherwise Auto Print Software will not able to communicate with WooFood API
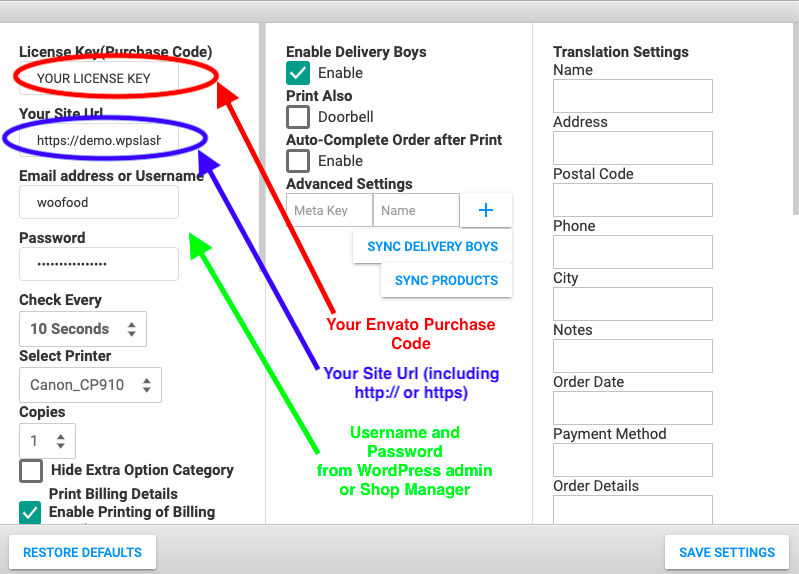
After installing the WooFood Windows Software, on the first open a message will pop up to type your License Number(It’s your purchase code), the domain name (where you installed the WooFood plugin), the username and the password. After typing all of them …press Save Settings settings….and restart the app for the changes to take effect.
You can change also the labels of the printed order like Order ID, Order Date, Payment Method, etc by going to settings on Translation Section and translate them to your language
Also, you can check the option to set the order as completed automatically after printed by checking the checkbox AutoComplete Order After Print.
Note: Be sure that the time on your computer is correct (otherwise you will not be able to activate the windows software and connect to your website).
If you have multiple locations of your restaurant you can enable WooFood MultiStore Plugin to be able to accept orders for all of your stores (Each store will be able to see only their own orders).
Upload the plugin enable it.

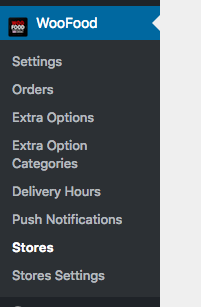
After Enabling the plugin you will see that 2 more setting pages added under WooFood plugin
Let’s say that you have two stores. First, you will need to create to Multistore Users (New WordPress role added by Multistore Plugin), one for each store.
Go to Users -> Add New and create a new user and select as Role MultiStore User
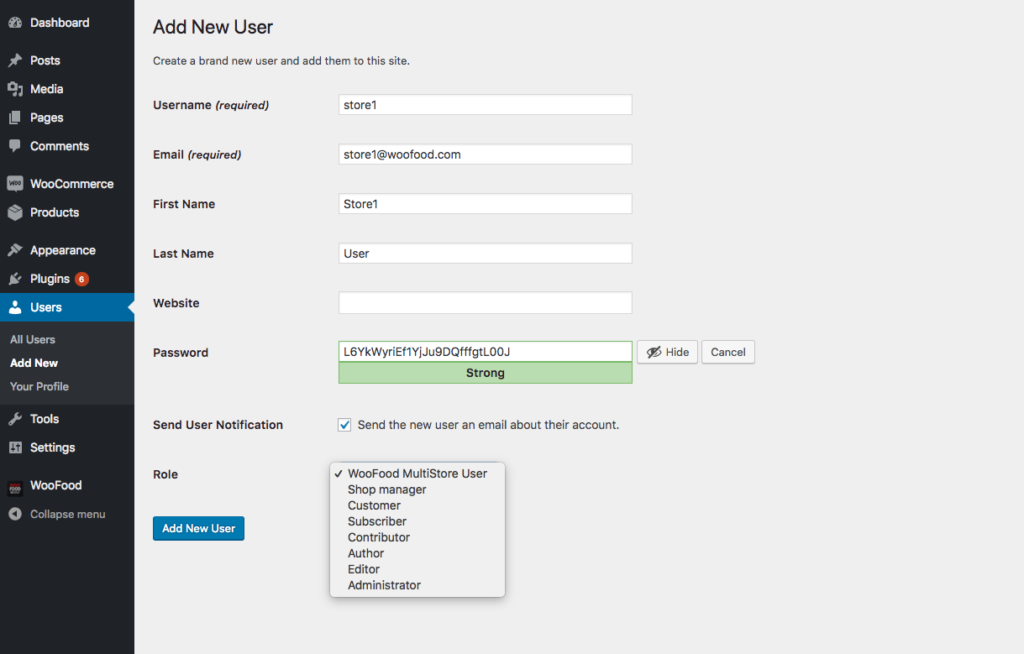
Repeat the above step to create another user also for the other store.
And now let’s see how to assign the users to each store.
Navigate to Stores and create your first Store by pressing Add Store and complete Store Address, Store Email Address, Phone Number and Maximum Distance for Delivery. Extra Store Key is not required for the current version, so leave it empty.
You will see also a select user where you can select which user will have access to this store. You will need to assign a user to be able also to automatically print the orders using the software.
You are ready with Multistore Configuration.
Each User will be able to see only their store orders.
Note:Use the user logins details to connect the Auto Print App.
Note: Do not connect to the automatic printing app using admin logins or shop manager logins when you are using the multistore plugin. Because you will get all the orders from all the stores.
-Yes, you can use normally the WooFood plugin with your own theme. Keep in mind to tweak the CSS styling to match with your theme design.
– By enabling Accept/Decline Orders under WooFood settings, the restaurant must accept the order first in “live mode” before finalizing the order and the restaurant can accept or decline the order. If the restaurant accepts the order can select also the approximate time it will take for the client to receive the order.
– The first Google API is using Maps Javascript and I used to auto-complete the address while the user is typing. The second Google API is using the Distance Matrix API library to calculate the distance from the store to the customer. If you leave empty these fields autocomplete will not able to work also distance will be unable to get calculated.
– Be sure that you have enabled permalinks under Settings->Permalinks. Otherwise, WooFood Auto Print Software will not be able to communicate with WooFood API and get the orders. Also, be sure that you are using the correct login credentials and the user role is Administrator or Shop Manager or Multistore User(if you are using multistore and have the multistore plugin enabled). Check also that you have completed the full URL of your website including http or https and the purchase code is correct.
– You can use any payment gateway for WooCommerce as WooFood depended on WooCommerce.
If you couldn't find the information you were looking for in this documentation, our support team is here to help you.
Create a support ticket and our team will respond as soon as possible.
Submit Ticket